.jpeg)
Planning the Open Spaces: Our Bonus Room
- Amber
- Jun 2, 2022
- 6 min read
Updated: Jun 2, 2022
I realize that pictures speak louder than words, and though some of you check out the Blog, you probably aren't perusing through the rest of the a.l.r's website. Which means you are missing out on all the exciting things I can do for your space! So, to grab your attention one more time, I'm going to give you a sneak peek at some plans for our upstairs bonus room + the process of bringing it to life.

Step 1: Measurements. This is a pretty important step, especially when construction is involved. To get started on a restyle it doesn't need to be exact but the more accurate the information, the more accurate the design. Ceiling height, window size, doorways - I need it all. It gives a more accurate visual depiction, and provides the necessary furniture measurements when sourcing out the finishing pieces. There are a few ways I can do this: I start from scratch and build the floorplan manually from dimensions + photos, I upload an existing layout, or I bring a brand new one into existence (which will need to be certified by…not me!) Regardless of how I do it, I can't move forward with anything else until I know what I'm working with. In the case of our bonus room, I was able to use some information from existing plans and fill in the information I was missing using math. Can you feel my headache?


*For everyone wondering what our upstairs looks like: Feast Your Eyes! ...and show your kids, they always seem to be the most curious.
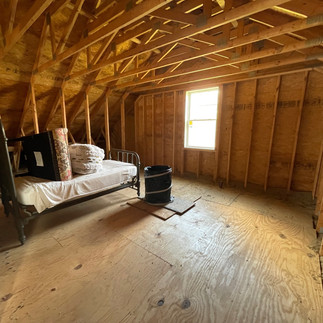
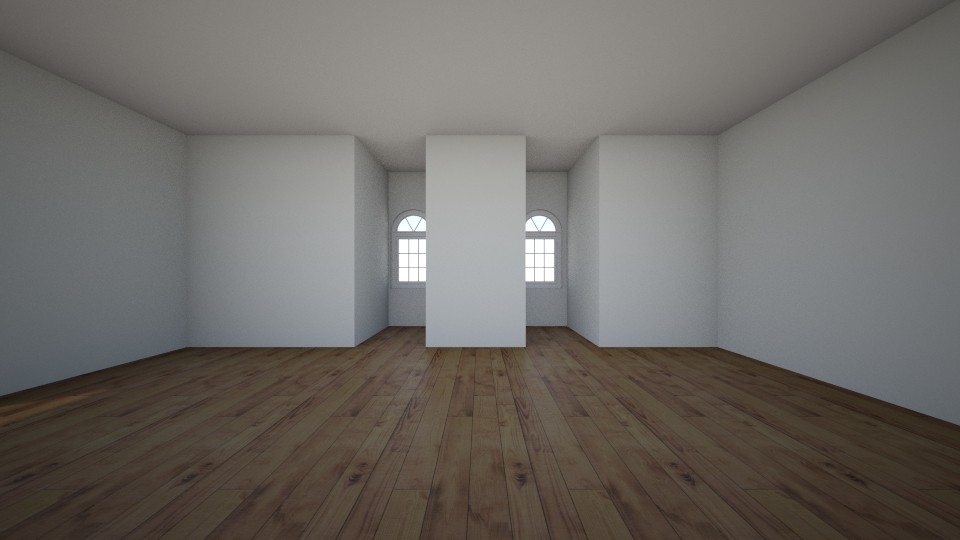
Step 2: Build Up. Once I have the floorplan built out, I like to view the empty space as a 3-dimensional render to be sure the floor, windows, doors, and walls all look correct. Software can be finicky and there are so many ways to make a mistake. Overlapping the information can cause glitches in the design leading to major errors in the spatial plans. Weird angles and slanted floor (if you can even imagine that in a program) can throw off the entire process, especially when you need to delete the walls and the subfloor before attempting to add them back to an existing layout. UGH. I'll be honest, using partial information for one big space is far easier than when you are trying to incorporate a half bath, stairway, and bedroom. Not to mention interpreting the roof slant and where the living space actually begins amid the trusses & beams. There are times when wiping the slate clean and starting over from the beginning is really the only option. Below is an example of the actual space, and the 3D render built out of the floorplan dimensions. Swipe -->


Step 3: Spatial Planning. Back to the 2-dimensional plane to place the pieces, develop the flow, and determine the general layout of how the space will be used. This step can sometimes be enough for the client to get a feel for their space and take over the creative process for themselves. Always start with the placement of the largest pieces to determine flow, then turn your focus to function. Use the plan as a map to determine details such as the type of door that will work best for the space, and sometimes in the case of new builds, possibly adjusting the current dimensions to accommodate a specific design layout or piece of furniture. For example, do your current plans call for multiple doors in a bathroom that will most likely bump each other - maybe a pocket or barn door would work better in that space. Or, do you know that you want windows of specific size placed on either side of your bed - all of these details can be worked out in the spatial planning. We had a few of these scenarios in our house, some during the construction phase which was convenient to address (pocket doors on our Jack + Jill bathroom), but the barn door off the laundry room was the result of a hard lesson learned when the washing machine door was constantly bumping the traditional laundry room door. We also recessed our bedroom door opening for an added sense of privacy, and added a couple closets that we otherwise wouldn't have.
Step 4: Rendering. A Full 3D render is my most favorite part of the design process. Do I sometimes add more detail than necessary, Yes. Can I help it, No. Decorating is my favorite part of any project and the 3D renders allow me to add all the necessary details to set a mood, tone, and feel of the space before it's actually finished. It's the deciding factor for how you move forward with the project, and for those of you who don't feel like you are great a visualizing, it's the final draft come to life. For our upstairs bonus room, we eventually want a laid-back area for entertaining, with a convenient half bath, and an additional guest bedroom. I can literally get lost in the details of design, so I added enough to provide a general overview of how the space will be used and examples of the tone + texture I want to use to accomplish the overall feel of the space.

The bonus room space is not huge, but planning the layout ahead of time allows me to determine how to maximize the space both functionally and aesthetically. There are 2 dormer windows on the front, and south facing window at the end of the room - to me that's not a ton of natural light. I'm a fan of natural light, so to maximize what's available and brighten the space I'll add a mirror directly across from the south facing window. This area will also serve as a wet bar with pendant lighting, a wine fridge, and appropriate storage for the necessities. The walls are painted a bright color to make the space feel larger, and allowing for the door and trim piece to contrast with a darker color. A fun twist on traditional design.


The furniture pieces are a touch oversized for a cozy feel, and choosing ottomans over tables provides for additional seating as needed. Perfect little find, I sourced an ottoman that doubles as a cocktail tray; cushion around the circumference of the stool but a wooden center built in for a sturdy serving space and the tray lifts out. Placed below where the TV will be mounted, it can be tucked out of the way when it's not being used but still provide a function. The shelves on either side of the window add height to the room, but the industrial design keeps the structures open and airy to balance the small space. Additionally, the dormer closest to the shelves houses a small writing desk for a bit of privacy with a beautiful view, which from this high lets you catch a glimpse of Lake Ontario. It's likely there will be recessed lighting in the ceiling as well as we have it throughout the downstairs, but we very rarely use it, preferring instead the warm glow of a lamp or two.


The bathroom will be a simple design utilizing the vertical space to keep an uncluttered feel, and the bedroom will provide a private abode made for sleep. The light paint is offset by a dark accent wall and the aforementioned dark doors. We currently have my great (great?) grandma's brass bedframe in that space and it's a perfect fit. The space is limited as is, and to build a small closet along the far side will eat up a fair bit, but it provides some grandeur to the room and minimal furniture pieces keep the flow of the room open. Wall mounted side tables + lamps leave some square footage on the floor by efficiently using vertical space where we can. There is also a window opposite the bed that allows for natural light, which again will be reflected around the room by the wall mirror.


So, there you have - my current idea for our upstairs bonus room- brought to you by the services of a.l.r Interior Home. I'm pretty in love with it. The tone is a balanced mix of masculine and feminine. It's a neutral space to relax or entertain. It serves to accommodate.
I realize that not many people would have envisioned such a space just by looking at a floor plan on a page, or a bunch of bare studs, or even just a blank wall - but every space holds potential. If you are looking to restyle, redevelop, or repurpose any space in your home, I am very happy to help. You might have an idea but aren't sure how to execute it, or you might not even have an idea - I'm very happy to offer one, and I would absolutely love to help you fall in love with your home.
Until next time Friends!
Comments